20071025

MySpace Page Customizing Tutorials and Code


MySpace Page Customizing Article Contents


MySpace changes, problems, updates, code fixes related to recent changes


customized online now icon code that works


Page Layout, Layering, Classes


MySpace Page Layout Showing Divs, Tables, Cells, Classes (Regular and Band Page)


MySpace Blog Page Customize Style


DIV OVERLAYs


Div Overlay Tutorial MySpace Band Page


Simple Div Overlay Tutorial for MySpace Page


Simple MySpace Div Overlay using Floating Div blocks inside a Core Div


Turn your mySpace page into a Spoof Deleted or Error Page


Music Players and Videos


Hide MySpace Music Player (includes Band 4 Song Player)


Resizing and Moving the MySpace 4 song music player


Video Posting Guide Blogger and mySpace


Top Page Area


Top Navigation Menu Bar, Style, Hide


Place a Custom Top Banner MySpace


Band Page Top Area and Menus Including Maroon Nav Bar


Ad Banner Un-Hidding if Hidden, Understanding, Styling


LEFT


MySpace Left Side Styling Hiding


Top Left ProfileInfo MySpace Profile Img, Last Login, Location, Age, Sex, Styling


mySpace Band Page Top Left Profile Image, Location, Last Login, Customize and Style


mySpace URL box userProfileURL hiding, styling


mySpace Details Table userProfileDetails hiding, styling, creating custom Details Tables


RIGHT


mySpace Right Side Hide and Style Routines


MySpace Blog latestBlogEntry, hiding, styling, importing into Div


Create Custom Table (Div or other Content) above Blurbs


Blurbs (About Me/To Meet) Styling, hiding, etc ...


Calendar MySpace Styling Hiding Moving


MySpace Friend Space, Styling, sizing, coloring, hiding, moving


MySpace Comments FriendsComments Structure, Style, Move


MySpace Center Only Comments


BOTTOM


MySpace Bottom Links, copyright cc, Gray background


Band Page


mySpace Band Page Shows Hiding, Styling, Moving, importing into Div Overlay


OTHER


One column Centered Layout


Picture placement and Alignment MySpace, Blogger, other web pages


image effects change image when hovering over


MySpace Eliminating Excess White-Space


Firefox Marquee Bug, Direction Up or Down


I hate splinks for many reasons


20070814

Page Layout

Table/Div Structure of the Page


myspace page showing div and table layout, and other useful things

myspace 2.0 page showing structure div table layout"
However, for the above I put the key (along with an iframe to show the above page) here:
myspace 2.0 page structure showing divs, layering, classes and more

20070811

Structure of the mySpace Band Page

Structure of the MySpace Band Page

To see the structure of the band page, go here:
myspace page showing structure of band page

20070801

custom online now icon myspace

This article has been moved to my other blog
(Sorry, but without a decent google rating, it just wasn't making the cut. I get beat out by all those sites with loads of advertising, and non-working code. But they do have cute icons, and I have only code.)

Now I have some icons, and have added all of those public domain icons (or at least the icons which photobucket considers released for use, based on the users settings) to the tool.

Or you can use your own icon.
I will try to keep the code on the below site updated (but I can not promise).

updated working myspace custom online now icons code myspace 2.0 and myspace 1.0

The article, where I originally published, what was at the time time only working online now icon code, can still be found here:
working code to install a custom online now icon on your myspace page

20070731

Editing your MySpace page Outside Of Myspace

This article was inspired by the numerous glitches in the myspace system, the long save wait times, the captcha not working, and those tiny edit boxes in the interests area.

To avoid as much frustration as possible; I now do all of my changes OUTSIDE of the myspace editor.

If I am working on any type of Div Overlay, I don't even bother with the default myspace page, when I am creating my div.
I just do this:

- Open Notepad
- Start my document by inserting the following code:
<html>
<link rel="STYLESHEET" type="text/css" href="http://x.myspace.com/js/myspace.css" />

</html>

Then I insert my code above the </html>

To test it I save as type .html (I choose all types and add the .html extension).
I then test it in both of my browsers (FF and IE) before even attempting to put it on my myspace page.

If I am testing style that is designed to work with, or override, the myspace core code, I instead do this:

Prepare yourself a Template
This step does use the myspace editor.

Go into the myspace page editor.
At the TOP of each data entry box put this:
<span class="off">!-START Custom Edits in .. -!</span>

At the END of each data entry box put this:
<span class="off">!-END Custom Edits in .. -!</span>

Replace the .. With the name of the section, if desired.
Save your Profile.
View Your profile.

While Viewing your profile, View Source.
If you are in IE (Windows) a clipboard (also called notepad) should appear with the source code in it.
If you are in FF a new window will appear with the code in it.
I prefer IE for this particular task.
SAVE this as type html.

If you are using notepad you can do it like this:
File
Save As
when you get the pop up
Save as Type, select ALL Files.
Choose a name, and add .html as the extension.

Now if you double click on the filename, it will open in a browser.
That is how you will test it.
You can edit it in notepad.
Save your changes
And then refresh your view page to see the effect of the changes.


Because we entered our span blocks we can now easily locate the points where we want to insert the code.
Try this (in notepad)
Edit
Find
type in span class="off"
Notice it takes you to your span block.


I usually insert a fair amount of whitespace above and below each of my span comment blocks. (Because we have put these span blocks in class off, they can serve as comments.)

Once you are done editing and testing outside of myspace, you can easily find the code blocks you need to paste into the myspace editor.

Simple Hide Routines, Right Side, Blogs, Extended Network

-- Hide right side myspace
<style type="text/css">
td.text table {visibility:hidden};
</style>
--Hide right side and remove the space it occupied
<style type="text/css">
td.text table {display:none};
</style>

-- remove blog area myspace
-- how do i hide my blog area only on myspace
<style>
table.latestBlogEntry {display:none;}
</style>

-- hide white space myspace
-- blank space after removing blog & extended network
-- how do you remove the white space where your extended network box used to be
[This is moot if the blogs and extended network are hidden using the above code. No more white space problem. If you have a whitespace problem, keep reading, and use the code I have here instead of the code you now have.]

-- hide extended network and move up my about me
-- hide extended network and move blogs up
<style>
table.extendedNetwork {display:none;}
</style>

-- remove blog and extended network no white space
-- hide extended network and blogs and move up my about me
<style>
{! hide extendedNetwork and blogs !}
.extendedNetwork {display:none;}
.latestBlogEntry {display:none;}
{! due to carriage returns we need to move the blurbs up slightly !}
{! first I control the size of the carriage return so the distance is the same on different browsers !}
br {line-height:12px;}
.blurbs {position:relative; top:-24px; margin-bottom:-24px;}
</style>

MySpace: Adding Custom Content to the Bottom of the Page

This article has been moved:
Add a custom Div to the Bottom of your MySpace Page

20070729

The Simple Div Overlay MySpace Band Page

Building a very simple Div Overlay for the MySpace Band Page.

Article Moved to Here:
My Space Band Page Simple Div Overlay

It is the same article, but with more updates.

I am trying to consolidate my stuff back on my original blog (which has mixed content, not all myspace). I was in the process of moving the myspace stuff off of the above blog to this one. That turned out to be a worse idea than I previously thought.

Adding an Image Banner To Band Page, near Top

This article has been moved:
Top Banner to Top of MySpace Page, Custom Banner Top of Band Page, Custom Banner Top of MySpace page

Or for a tool that will give you the needed code, go here:
myspace 2.0, myspace 1.0, add top banner

20070724

Band Page Top Page Space, Menus, Ad Banner

This article has been removed.

The Band page top area, is the same as the standard page (up to, but not including, the maroon nav bar).

I have an article, which I did update, based on the newest changes, here:

Myspace Top area, Ad banner, Search Area, Top Menu

20070405

MySpace Band Music Player

Addressing the Music Player

Looking at This Diagram , which shows the Layout of the Myspace Music Page; I can see that the music player can be addressed as follows;

table table td.text div object

I also know (because I read the code to troubleshoot some issues) that for Non IE browsers, it is really here:

table table td.text div object object


There are other ways of addressing the music player, I prefer the above syntax.
It is as explicit as reasonable. If I was overriding something, or thought there would be a need to over ride this code line, it might make since to do this:
table td table td.text div object

If I have other objects on my page, it becomes more important that I address my player as explicitly as possible. If I do not, it is not as important.


If I have no other objects on my page, I can take the super shortcut.
I can use just this
object {the stuff I want to do to it}


If I want to move the player, to the top left of my page (or my div if I have installed my div such that the player is logically inside it). I do this:
<style>
.i {display:none;}
table table td.text div object {position:absolute; top:0px; left:0px;}
table table td.text div object object {position:static}
</style>

If I want to move the player 100 pixels to the right, of its current location, I do this:
<style>
.i {display:none;}
table table td.text div object {position:relative; top:0px; right:-100px;}
table table td.text div object object {position:static;}
</style>
If I want to position my player, with reference to the top center of the page, I want to use this:
<style> 
.i {display:none;}
table table td.text div object {position:absolute; top:0px; left:50%; margin-left:-100px;}
table table td.text div object object {position:static; margin-left:0px;}
</style>
Unless you are using a div overlay, which uses a concept that allows it to be used as a reference point for the absolute positioning of the myspace page elements, you want to use the above method.
If you used my div overlay strategy, you can instead use the top left of your div as the reference, and use the example that does not require the margin-left value.

In both examples, left can be changed to right; and the numbers can be altered to work with your profile.
However, do NOT change the 50%, that is what allows you to measure from the center.
50% is the ONLY value that will insure you are measuring from the center, no matter what the screen/page size is.


It is no longer as easy to resize the player. Shrinking the player crops it, instead of really shrinking it.
A matrix filter can be used, in IE, to shrink it, but then the controls do not align correctly (and the filter does not work in other browsers).

IF you have other objects, on your page, Give those objects their own class (or put them in a div with its own class)
Then for each style attribute, you set for the music player, you need to have an override command, to set that style attribute, for your other objects.
For example:

<div class="myObject1">
object code here
</div>

Now I insure that I have set the position for this object. If I want it to position using flow (meaning I just let it fall, where it will, based on where I put the code) I need to assign position:static. This is to override the position:absolute which was applied to the music player object.
<style>
table table td.text div.myObject1 object{position:static !important;}
</style>

OR, you can apply positioning to the object.
However, since you have it in a div, it really makes more sense to just position the div.
<style>
div.myObject1 {position:absolute; top:300px; left:50%; margin-left:-100px;}
table table td.text div.myObject1 object{position:static !important;}
</style>
Notice that I still assigned the object position:static to override what I had applied to the music player object.

20070404

MySpace Band Shows; Styling, hiding, displaying

Band Page Shows, Styling, Hiding, Displaying on a Div Overlay

The following diagram shows the band page show section.
To see how this fits into the complete page, see this:Structure, Div/Table/cell layout of the myspace band page

The below diagram is an extract, of the div containing the shows, from the diagram I link to above. The Div (which is the outer structure in this diagram) is two tables deep and in the cell which makes up the right column. This cell is in class td.text
This div, can be addressed as
table table td.text div

Div (no class)
Table (No Class)
td (no class)
td.text
span.whitetext12
span.whitelink
a (link)
A Font Tag is used, which my above diagram down not show. I do show it in the below diagram where I apply styling.

Unless you have added a custom div, to the right column, the only other div elements, effected by the address
table table td.text div
are
1) the empty div in the friendSpace
2) The div of class commentlinks in the comment space
3) The div around the music player (which only showed up recently)

The "Upcoming Shows" header is in class whitetext12.
It is the ONLY element addressed like this:
div table td.text span.whitetext12
(I took a shortcut and started with the div. This can be done if you are certain it is not causing an additional conflict which would not otherwise occur).

If I wanted to be more explicit, thus reducing the potential of conflict I would not leave any layers out of my address:
table table td.text div table td.text span.whitetext12

Leaving out the td between the first two tables does not add any additional risk, since it has no class assigned, and there is ALWAYS a td between two table layers. I leave out the tr for the same reason. It is only when it has a class assigned that it may add value to include it.

The below block styles the shows to look like this:

Notice the use of font. One thing my previous diagram missed was the use of the font tag. I did need it in the below style block to get the above.
<span class="off">!-Style Shows-!</span>
<style>
{!-Border around shows table-!}
table table td.text div table {border:3px solid; border-color:magenta;}
table table td.text div table table {border:none;}
{!-background of most of the shows space-!}
table table td.text div table td {background-color:pink; }
{!-form inner borders with background color-!}
table table td.text div table table {background-color:maroon ;}
table table td.text div table table table {background-color:transparent;}

{!-style text-!}
table table td.text div table table td.text span.whitetext12 {color:blue !important; font-size:13px !important;}

table table td.text div table table a {background-color:yellow; color:hotpink}
table table td.text div table table span.whitelink {background-color:PaleVioletRed ; border-bottom:2px PaleVioletRed solid;}

table table td.text div table table span.whitelink a {color:purple !important; background-color:mistyrose !important;}

table table td.text div table table table font{color:green !important; font-size:11px; font-weight:bold}

table table td.text div table table font {color:DarkBlue !important; font-family:Impact !important; font-weight:bold; font-size:12px}

</style>
<span class="off">!-END Style Shows-!</span>


Putting Shows in a A Scroll Box
I no longer recommend doing this at all, due to the div around the music player.
It is not impossible, but I am not sure it is worth it.

In non IE browsers it is really easy
IE is more of a problem.

note to self: write an app to hold the shows, to solve this problem.

20070402

Band Page Insert Custom Table (or Div) Under Friends

Inserting a custom section (Table or Div) under the Friends

This does NOT work on the standard page.

The below code block creates a div, above the comments and below the friendspace. I used a size of 700px wide, and 300px in height, and then shifted the div toward the center. You can change these values. The friendSpace stays to the right.

<span class="off">!-Start Block to create Custom Div Under Friends and Above Comments-!</span>

</td></tr></table>
</td></tr></table>

<div class="myD1" style="position:relative; top:0px; width:450px;">

<span class="off">! Custom Content: You can use a Table or a Div here. ! </span>
<div class="myD1" style="position:absolute; bottom:0px; right:50px;
width:700px; height:300px; border:3px green dashed;">

<span class="off">!START YOUR CUSTOM CONTENT HERE.
If right column length increases, this will automatically move down.
If left column length increases this will NOT move down.
If left column intersects this space, you can add a top margin to fix the problem!</span>

CUSTOM CONTENT HERE

<span class="off">!END CUSTOM CONTENT!</span>
</div>

<table class="off"><tr><td>
<table><tr><td>

<style>
{!- set below px value to the same value as the height of your custom div-!}
table.friendSpace {margin-bottom:300px;}
</style>

<span class="off">!-END Block to create Custom Div Under Friends and Above Comments-!</span>


You can replace the custom div (myD1) with a table if you want. Give it the same style clause I used for the div.

MySpace Put Friends And Comments in Scroll Box

This Article Has been moved:
MySpace put Friends and/or Comments in Scroll Div

My Main Blog:
Coboble (aka Eileen)'s Blog

20070401

Add Image to Top of MySpace Page

Adding an image to the top of your myspace page, above the ad banner

For a longer article on this subject, with more examples go here:
Adding Custom Banner to Top of Myspace Band Page
I wrote it for the band page, but all but one of the examples works on the regular page as well.

Note: I have read, in a popular myspace forum, that it is against the Terms of Service to move the ad banner down. However, I did not find this in the terms when I read them. No one has been able to tell me where, in the terms of service, this information resides. The Terms of Service do state that it is against the rules to OBSCURE the ad banner. Read the rules yourself and use your own judgement.

Instructions for Placing your own image banner above the Ad Banner:

First move down the rest of the page by adding a top margin:
<style type="text/css">
{!- Move Profile down to accommodate banner above profile -!}
body {margin-top: 90px;}
{!- below line is for profiles which have rendered div img hidden or display none -!}
div.myBannerClass img {display:inline; visibility:visible};
</style>
(adjust px value as needed based on the height of your picture)

Next I create a div for my picture.
As an example I will use this banner.
test banner
To find my banner size I use it as the url and open the page:
mouse-right-click -> properties.
A small popup will tell me the width and height.
For this one it is 729 x 90
Half of 729=364.5

So my code to place the banner looks like this:
<div class="myBannerClass" style="position:absolute;left:50%; 
top:0px; margin-left: -364.5px; width: 729px; height: 90px; visibility:visible;">
<img src="http://i178.photobucket.com/albums/w275/madeline_fogg/smiley-banner2.jpg" border="0">
</div>

Just replace with your own px values (based on your picture size) and the location of your own picture.

Turning the image into a link
If you want your image to act as a link, use this code instead of the above block.
<div class="myBannerClass" style="position:absolute;left:50%; 
top:0px; margin-left: -364.5px; width: 729px; height: 90px; visibility:visible;">
<a href="http://spiff-myspace.blogspot.com">
<img src="http://i178.photobucket.com/albums/w275/madeline_fogg/smiley-banner2.jpg" border="0"></a>
</div>

For band (or other artist) profile add code to the bio section
For standard profile, you can add the code to the about me section.

[note: there are other locations the code can be added to as well, the best location depends on what else you are doing on your page and how the rest of your customizing code is (or is not) organized]

You can also utilize the navigationBar as a means of getting accurate placement of a banner.
By using the navigationBar, and the background-image property, we can get accurate placement without any reliance on absolute positioning.
IF you are keeping the google search, or placing the banner below the top navigationBar, this method has much better accuracy then the the above method.

<span class="off">!-START Block to Place Custom Banner at top of navigationbar. 
This works for Artist/Band page and Standard Page-!</span>
<style>
{!-make room for banner-!}
div table.navigationBar table {margin-top:100px;}
{!-place image as background to outer table of navigationbar-!}
div table.navigationBar {background-image: url(http://i10.tinypic.com/639n3br.jpg) !important;
background-repeat: no-repeat !important;
background-position: top center !important; width:800px !important}
{!-allow image to show through td coloring-!}
div table.navigationBar td {background-color:transparent !important}
{!-restore or custom set background color to navigationbar-!}
div table.navigationBar table {background-color:lightblue}
</style>
<span class="off">!-END Block to Place Custom Banner top of navigationBar -!</span>

Replace my url with the url of your image.
If you want to put the banner below your navigationbar, change top to bottom (in both places).

20070313

mySpace Interests And Details

class="interestsAndDetails" is actually at level
table table table.interestsAndDetails
I have taken a shortcut in all of the below and started with level table.interestsAndDetails
table.interestsAndDetails
Table (no Class)
td (no Class)
td.text
td.tdborder
table.interestsAndDetails span.lightbluetext8
table.interestsAndDetails span.whitetext12
To see how this diagram fits into the whole page
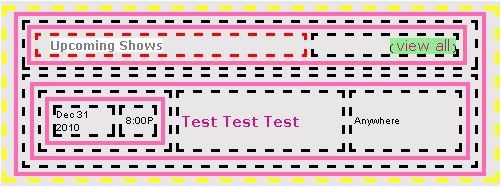
 Click Here
By referring to the above diagram I can easily figure out the needed codes to style this space.

The interests table is at this level:
table table table.interestsAndDetails
It can also be addressed in many other ways, some of which are:
.interestsAndDetails
td td table.interestsAndDetails
table td table td table.interestsAndDetails

I prefer this:
table.interestsAndDetails

If I want to eliminate the entire table, and effect nothing else in the profile, I can use this:
<style>
table.interestsAndDetails {display:none}
</style>
This will leave some space due to the carriage returns above and below the table. These can be eliminated by either resizing the carriage return (if you want to effect the space between all tables), using a margin bottom on the table just above the interests table, using a negative margin-top on the table just below the interests table, or relative movement up, of the table just below.

In the below I use a margin-top on the table just under the interests table. The reason I choose this, is because the music player is above. The music player can NOT be addressed without effecting other objects on the page.
<style>
table.interestsAndDetails {display:none}
table.userProfileDetail {margin-top:-12px}
</style>
If you have removed your details table, replace it, in the above code, with the table which currently resides just below the location you removed your interests table from.

Removing the Left Column (where the row headers are)
This leaves the table header in place, removes the row headers, and makes the table appear as one single column.
<style>
table.interestsAndDetails span.lightbluetext8 {display:none;}
table.interestsAndDetails table td {width:auto !important; padding:0px; }
</style>

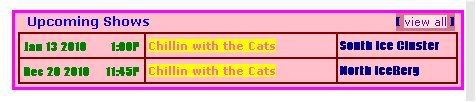
Styling the text in the interests section
The below code block styles all of the text in this section. Before each line there is a comment indicating what is effected by the line of code.
You can replace the fonts and colors with the style you want.
<style>
{! style main interests heading !}
table.interestsAndDetails td span.whitetext12 {color:hotpink !important; font-size:22px !important; font-family:impact; background-color:lightgreen}
{! style row headers !}
table.interestsAndDetails td span.lightbluetext8 {color:darkblue !important; font-size:16px !important; font-family:Arial; background-color:yellow}
{! style the rest of the text !}
table.interestsAndDetails td, table.interestsAndDetails td a {color:green !important; font-size:12px !important; font-family:Comic Sans MS; background-color:lightblue;}
</style>
For a list of available fonts go Here
For a list of additional font attributes you can use in the style line go Here

Eliminate some Interests Table Rows
IF you do not put data into a specific row, the row should not show up. However, if you have code in it, it will show up.
And sometimes, it just shows up.
To eliminate a single row, it takes two lines of code.
Place this code at the BOTTOM of the row just above the row you want to eliminate.
<table class="off"><tr><td>
Place this in the row you wish to eliminate:
</td></tr></table>

(There is a way to eliminate the "General" row, but because it takes a chunk of code, and a new class, and is best accomplished by just not putting data into that space, I will leave that out for now.

Custom Headers
If you want ALL Custom Headers, I suggest you make a complete custom Interests Table.
To learn how to do that go Here: Creating a Custom Interests Table
If you want SOME custom headers:
It is easiest to change the row headings which are BELOW the General, so I will cover those first.
To change any single heading, without effecting the others, place this code in the section ABOVE the heading you wish to change:
<table class="off"><tr><td>
AND Place the below block at the TOP of the Row you are changing:
</td></tr></table></tr></td>
<tr><td><span class="lightbluetext8">CUSTOM HEADING</span></td>
<td width="175" bgcolor="d5e8fb" style="WORD-WRAP: break-word">
Your data for this section goes here

Changing the Heading for the General Interests Column
If you want to change the heading for the "General" interests column, it gets more complicated. Because there is no data entry point, BEFORE this title is created, we have to enter our code AFTER the creation of this title.
Therefore we have to create a new class, so that we can hide the old "Genreal" heading without hiding our new heading.

Place this block at the TOP of the General Interests Row:

<span class="off">!-START code for custom General Interests Row header-!</span>
<style>
table.interestsAndDetails table {display:none;}
table.interestsAndDetails table.myI2 {display:block;}
</style>
</td></tr></table>
<table class="myI2" bordercolor="000000" cellspacing="3" cellpadding="3" width="300" align="center" bgcolor="ffffff" border="0">
<tr><td valign="top" align="left" width="100" bgcolor="b1d0f0" NOWRAP><span class="lightbluetext8">

Your CUSTOM HEADING

</span></td>
<td width="175" bgcolor="d5e8fb" style="WORD-WRAP: break-word">
<span class="off">!-END code for custom General Interests Row header-!</span>
Data to go with your Custom Heading goes here

If you want to change to main heading (the heading that says "Your-Name's Interests), you also have to re-create the "General" heading. This also requires that you assign a new class to the interests table (the default class interestsAndDetails will be used to hide the residue text from the old header).
Therefore, if you have used my style block above, you must replace table.interestsAndDetails with table.myInterests

Place this code at the top of the General Interests Box:
<span class="off">!-START code for custom General Interests header-!</span>
<style>
table.interestsAndDetails {display:none;}
table.myInterests {display:block;}
</style>

</td></tr></table></td></tr></table>
<table bordercolor="6699cc" cellspacing="0" cellpadding="0" width="300" bgcolor="ffffff" border="1" class="myInterests">
<tr><td class="text tdborder" valign="middle" align="left" width="300" bgcolor="6699cc" wrap="" style="WORD-WRAP:break-word">&nbsp;&nbsp;&nbsp;
<span class="whitetext12">

YOUR CUSTOM TABLE HEADER

</span></td></tr>
<tr valign="top">
<td class="tdborder">
<table class="myI2" bordercolor="000000" cellspacing="3" cellpadding="3" width="300" align="center" bgcolor="ffffff" border="0">
<tr><td valign="top" align="left" width="100" bgcolor="b1d0f0" NOWRAP><span class="lightbluetext8">

YOUR CUSTOM ROW HEADING

</span></td>
<td width="175" bgcolor="d5e8fb" style="WORD-WRAP: break-word">
<span class="off">!-END CODE FOR CUSTOM INTERESTS HEADER-!</span>

YOUR GENERAL INTERESTS HERE

Blog Archive

About This Blog

I am in the process of moving my myspace content to this blog.
Right now it is split between 4 different blogs.
I started playing with myspace code customization in late February 2007 after my niece convinced me to get a page.
When I first started writing code for people, I had no intent of publishing any of it, or even writing as much as I did.

I do not claim that all of my code is better than anything else out there. I have come across a few pages with some pretty good code on them. But for the most part, the same exact codes, with the same side effects and same lack of comments exists on many many pages.
My code is my own. Only the very simple routines (those where the best solution is obvious) are the same as the masses. If I find something good out there, that I did not write myself, I will link to it instead of re-creating it.
First I will test it.